As preannounced here the GNOME Infrastructure switched to a new Account Management System which is reachable at https://account.gnome.org. All the details will follow.
Introduction
It’s been a while since someone actually touched the underlying authentication infrastructure that powers the GNOME machines. The very first setup was originally configured by Jonathan Blandford (jrb) who configured an OpenLDAP istance with several customized schemas. (pServer fields in the old CVS days, pubAuthorizedKeys and GNOME modules related fields in recent times)
While OpenLDAP-server was living on the GNOME machine called clipboard (aka ldap.gnome.org) the clients were configured to synchronize users, groups, passwords through the nslcd daemon. After several years Jeff Schroeder joined the Sysadmin Team and during one cold evening (date is Tue, February 1st 2011) spent some time configuring SSSD to replace the nslcd daemon which was missing one of the most important SSSD features: caching. What surely convinced Jeff to adopt SSSD (a very new but promising sofware at that time as the first release happened right before 2010’s Christmas) and as the commit log also states (“New sssd module for ldap information caching”) was SSSD’s caching feature.
It was enough for a certain user to log in once and the ‘/var/lib/sss/db’ directory was populated with its login information preventing the LDAP daemon in charge of picking up login details (from the LDAP server) to query the LDAP server itself every single time a request was made against it. This feature has definitely helped in many occasions especially when the LDAP server was down for a particular reason and sysadmins needed to access a specific machine or service: without SSSD this wasn’t ever going to work and sysadmins were probably going to be locked out from the machines they were used to manage. (except if you still had ‘/etc/passwd’, ‘/etc/group’ and ‘/etc/shadow’ entries as fallback)
Things were working just fine except for a few downsides that appeared later on:
the web interface (view) on our LDAP user database was managed by Mango, an outdated tool which many wanted to rewrite in Django that slowly became a huge dinosaur nobody ever wanted to look into again
the Foundation membership information were managed through a MySQL database, so two databases, two sets of users unrelated to each other
users were not able to modify their own account information on their own but even a single e-mail change required them to mail the GNOME Accounts Team which was then going to authenticate their request and finally update the account.
Today’s infrastructure changes are here to finally say the issues outlined at (1, 2, 3) are now fixed.
What has changed?
The GNOME Infrastructure is now powered by Red Hat’s FreeIPA which bundles several FOSS softwares into one big “bundle” all surrounded by an easy and intuitive web UI that will help users update their account information on their own without the need of the Accounts Team or any other administrative entity. Users will also find two custom fields on their “Overview” page, these being “Foundation Member since” and “Last Renewed on date”. As you may have understood already we finally managed to migrate the Foundation membership database into LDAP itself to store the information we want once and for all. As a side note it might be possible that some users that were Foundation members in the past won’t find any detail stored on the Foundation fields outlined above. That is actually expected as we were able to migrate all the current and old Foundation members that had an LDAP account registered at the time of the migration. If that’s your case and you still would like the information to be stored on the new setup please get in contact with the Membership Committee at stating so.
Where can I get my first login credentials?
Let’s make a little distinction between users that previously had access to Mango (usually maintainers) and users that didn’t. If you were used to access Mango before you should be able to login on the new Account Management System by entering your GNOME username and the password you were used to use for loggin in into Mango. (after loggin in the very first time you will be prompted to update your password, please choose a strong password as this account will be unique across all the GNOME Infrastructure)
If you never had access to Mango, you lost your password or the first time you read the word Mango on this post you thought “why is he talking about a fruit now?” you should be able to reset it by using the following command:
ssh -l yourgnomeuserid account.gnome.org
The command will start an SSH connection between you and account.gnome.org, once authenticated (with the SSH key you previously had registered on our Infrastructure) you will trigger a command that will directly send your brand new password on the e-mail registered for your account. From my tests seems GMail sees the e-mail as a phishing attempt probably because the body contains the word “password” twice. That said if the e-mail won’t appear on your INBOX, please double-check your Spam folder.
Now that Mango is gone how can I request a new account?
With Mango we used to have a form that automatically e-mailed the maintainer of the selected GNOME module which was then going to approve / reject the request. From there and in the case of a positive vote from the maintainer the Accounts Team was going to create the account itself.
With the recent introduction of a commit robot directly on l10n.gnome.org the number of account requests reduced its numbers. In addition to that users will now be able to perform pretty much all the needed maintenance on their accounts themselves. That said and while we will probably work on building a form in the future we feel that requesting accounts can definitely be achieved directly by mailing the Accounts Team itself which will mail the maintainer of the respective module and create the account. As just said the number of account creations has become very low and the queue is currently clear. The documentation has been updated to reflect these changes at:
I was used to have access to a specific service but I don’t anymore, what should I do?
The migration of all the user data and ACLs has been massive and I’ve been spending a lot of time reviewing the existing HBAC rules trying to spot possible errors or misconfigurations. If you happen to not being able to access a certain service as you were used to in the past, please get in contact with the Sysadmin Team. All the possible ways to contact us are available at https://wiki.gnome.org/Sysadmin/Contact.
What is missing still?
Now that the Foundation membership information has been moved to LDAP I’ll be looking at porting some of the existing membership scripts to it. What I managed to port already are welcome e-mails for new or existing members. (renewals)
Next step will be generating a membership page from LDAP (to populate http://www.gnome.org/foundation/membership) and all the your-membership-is-going-to-lapse e-mails that were being sent till today.
Other news – /home/users mount on master.gnome.org
You will notice that loggin in into master.gnome.org will result in your home directory being empty, don’t worry, you did not lose any of your files but master.gnome.org is now currently hosting your home directories itself. As you may have been aware of adding files to the public_html directory on master resulted in them appearing on your people.gnome.org/~userid space. That was unfortunately expected as both master and webapps2 (the machine serving people.gnome.org’s webspaces) were mounting the same GlusterFS share.
We wanted to prevent that behaviour to happen as we wanted to know who has access to what resource and where. From today master’s home directories will be there just as a temporary spot for your tarballs, just scp and use ftpadmin against them, that should be all you need from master. If you are interested in receiving or keeping using your people.gnome.org’s webspace please mail stating so.
Other news – a shiny and new error 500 page has been deployed
Thanks to Magdalen Berns (magpie) a new error 500 web page has been deployed on all the Apache istances we host. The page contains an iframe of status.gnome.org and will appear every single time the web server behind the service you are trying to reach will be unreachable for maintenance or other purposes. While I hope you won’t see the page that often you can still enjoy it at https://static.gnome.org/error-500/500.html. Make sure to whitelist status.gnome.org on your browser as it currently loads it without https. (as the service is currently hosted on OpenShift which provides us with a *.rhcloud.com wildcard certificate, which differs from the CN the browser would expect it to be)
Updates
UPDATE on status.gnome.org’s SSL certificate: the certificate has been provisioned and it should result in the 500’s page to be displayed correctly with no warnings from your browser.
UPDATE from Adam Young on Kerberos ports being closed on many DC’s firewalls:
The next version of upstream MIT Kerberos will have support for fetching a ticket via ports 443 and marshalling the request over HTTPS. We’ll need to run a proxy on the server side, but we should be able to make it work:
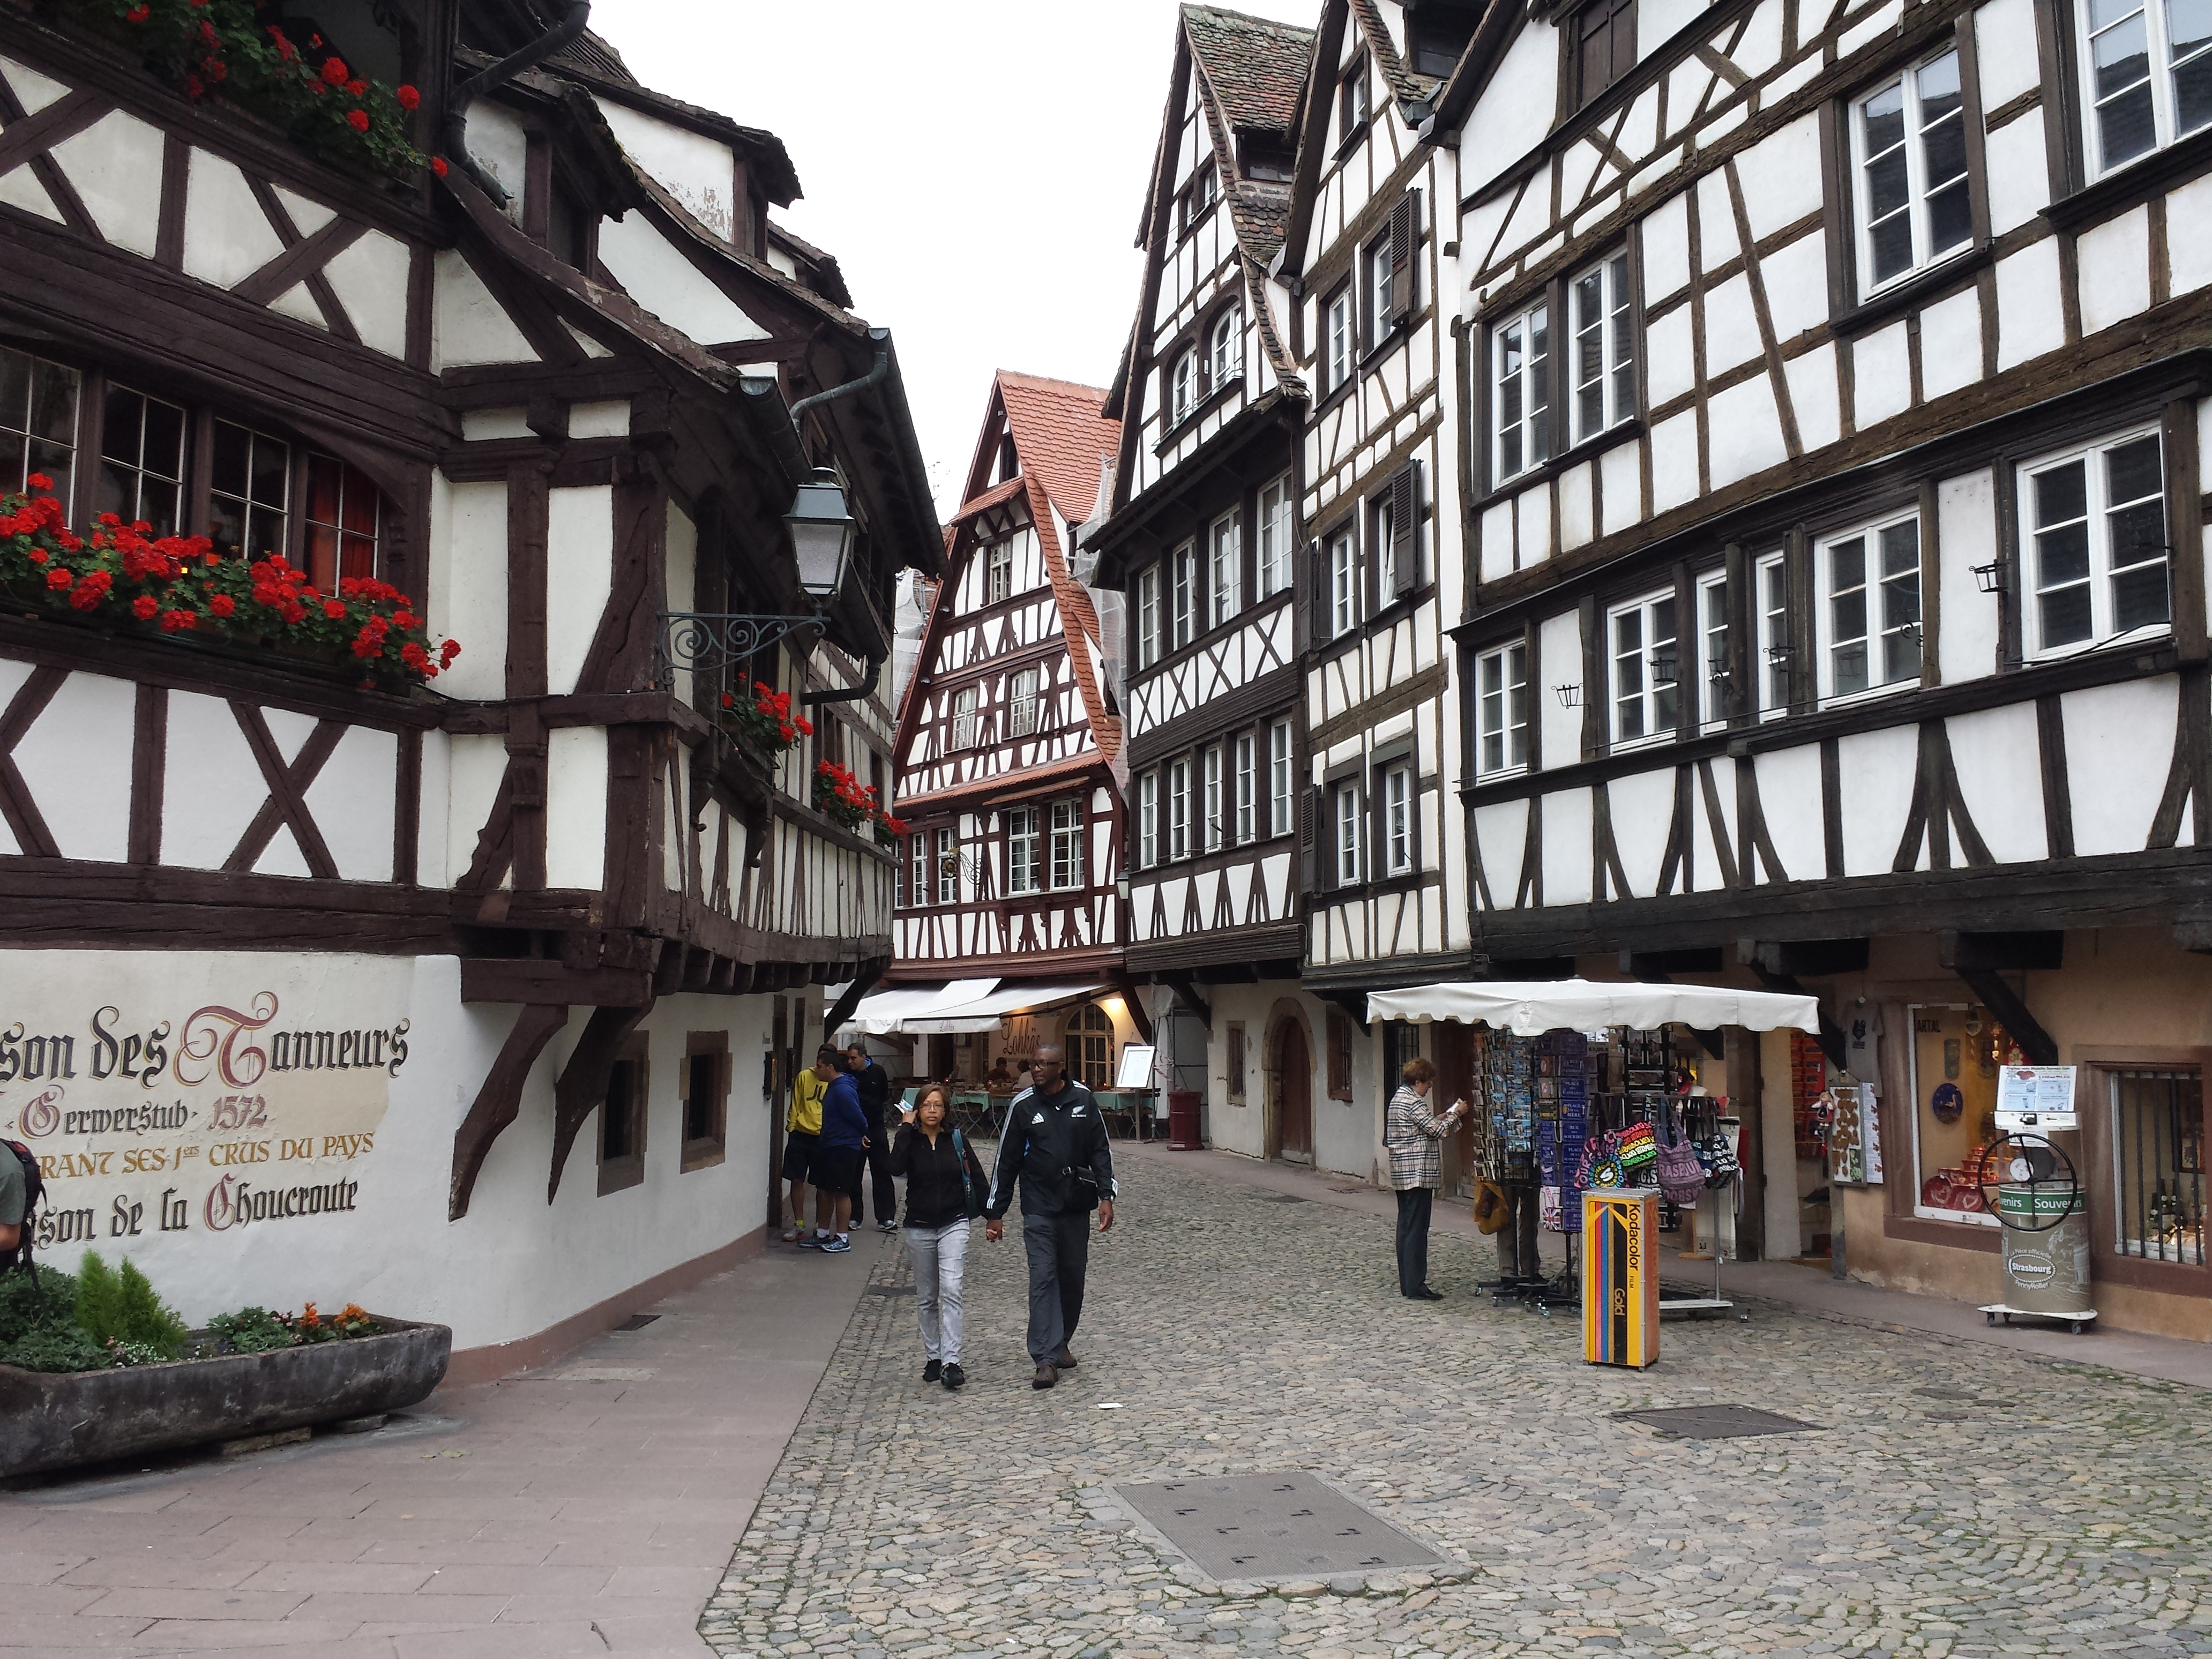
Coming back from GUADEC has never been easy, so much fun, so much great people to speak with and amazing talks to watch but this year has definitely been harder as I totally felt in love with the city that was hosting the event. Honestly speaking I’ve been amazed by how Strasbourg looks like: alsace houses and buildings are just delightful, the cathedral is stunning and people have been so welcoming during my whole stay. (cooks at the Canteen even prepared a few italian dishes and welcomed us in italian every time we were heading there…how cool is that?)
But let’s get back to our business now as I would probably never stop talking about Strasbourg and how great it was staying there! I did not have a personal talk this year but I presented the yearly Sysadmin Team report during the Foundation’s AGM. If you weren’t there all the slides are available here.
Apart from presenting what we did and what the changes we introduced on the GNOME Infrastructure were I participated to Patrick Uiterwijk’s talk about FedOAuth and all the upcoming changes that are planned on the infrastructure during the next months. If you were not able to attend Patrick’s talk this little resume should be for you:
Current problems:
The GNOME Infrastructure currently has a lot of different user databases which implies different users and passwords across the services we host
The Foundation’s database is currently MySQL-based while we do have LDAP in place for all our other needs already
Some of the tools we do use for managing our LDAP istance are not being maintained properly
Possible solutions:
Introduce FedOAuth, a SSO solution written and developed by Patrick Uiterwijk
Unify the various databases and make sure our LDAP istance is used for authentication everywhere
Remove Mango and configure FreeIPA
Benefits after the move:
Users will be able to manage their accounts on their own, no more need to poke the accounts team for updating passwords, emails, SSH keys. The accounts team will still be around to adjust ACLs
No more need for dozen of accounts, one for every single service we provide
More freedom when managing sudo accesses and accounts on the various machines we manage, this will help new people contributing to the Sysadmin Team (Making our puppet repository public and introducing a GNOME Infrastructure Apprentice group for newcomers is something we will be seriously evaluating after the FreeIPA move)
Your OpenID URL is https://$GNOME_USERID.id.gnome.org
Right now you can login with your GNOME account at the following services: l10n.gnome.org, opw.gnome.org. We are slowly migrating all the existing services to the new SSO infrastructure, please be patient and bear with us!
More information, slides and screenshots from Patrick’s talk are available here. Stay tuned and many thanks to the GNOME Foundation for sponsoring my travel and accomodation expenses!
The GNOME and many other infrastructures have been recently attacked by an huge amount of subscription-based spam against their Mailman istances. What the attackers were doing was simply launching a GET call against a specific REST API URL passing all the parameters it needed for a subscription request (and confirmation) to be sent out. Understanding it becomes very easy when you look at the following example taken from our apache.log:
May304:14:38restaurantapache:81.17.17.90,127.0.0.1--[03/May/2014:04:14:38+0000]"GET /mailman/subscribe/banshee-list?email=example@me.com&fullname=&pw=123456789&pw-conf=123456789&language=en&digest=0&email-button=Subscribe HTTP/1.1"403313"http://spam/index2.html""Mozilla/5.0 (Windows NT 6.1; WOW64) AppleWebKit/537.36 (KHTML, like Gecko) Chrome/34.0.1847.131 Safari/537.36"
As you can the see attackers were sending all the relevant details needed for the subscription to go forward (and specifically the full name, the email, the digest option and the password for the target list). At first we tried to either stop the spam by banning the subnets where the requests were coming from, then when it was obvious that more subnets were being used and manual intervention was needed we tried banning their User-Agents. Again no luck, the spammers were smart enough to change it every now and then making it to match an existing browser User-Agent. (with a good percentage to have a lot of false-positives)
Now you might be wondering why such an attack caused a lot of issues and pain, well, the attackers made use of addresses found around the web for their malicius subscription requests. That means we received a lot of emails from people that have never heard about the GNOME mailing lists but received around 10k subscription requests that were seemingly being sent by themselves.
It was obvious we needed to look at a backup solution and luckily someone on our support channel suggested the freedesktop.org sysadmins recently added CAPTCHAs support to Mailman. I’m now sharing the patch and providing a few more details on how to properly set it up on either DEB or RPM based distributions. Credits for the patch should be given to Debian Developer Tollef Fog Heen, who has been so kind to share it with us.
Before patching your installation make sure to install the python-recaptcha package (tested on Debian with Mailman 2.1.15) on DEB based distributions and python-recaptcha-client on RPM based distributions. (I personally tested it against Mailman release 2.1.15, RHEL 6)
The Patch
diff--gita/Mailman/Cgi/listinfo.pyb/Mailman/Cgi/listinfo.pyindex4a54517..d6417ca100644---a/Mailman/Cgi/listinfo.py+++b/Mailman/Cgi/listinfo.py@@-30,6+31,8@@fromMailmanimportErrorsfromMailmanimporti18nfromMailman.htmlformatimport*fromMailman.Logging.Syslogimportsyslog+fromrecaptcha.clientimportcaptcha# Set up i18n_=i18n._@@-200,6+203,9@@deflist_listinfo(mlist,lang):replacements['']=mlist.FormatFormStart('listinfo')replacements['']=mlist.FormatBox('fullname',size=30)+# Captcha+replacements['mm-recaptcha-javascript']=captcha.displayhtml(mm_cfg.RECAPTCHA_PUBLIC_KEY,use_ssl=False)+# Do the expansion.doc.AddItem(mlist.ParseTags('listinfo.html',replacements,lang))printdoc.Format()diff--gita/Mailman/Cgi/subscribe.pyb/Mailman/Cgi/subscribe.pyindex7b0b0e4..c1c7b8c100644---a/Mailman/Cgi/subscribe.py+++b/Mailman/Cgi/subscribe.py@@-21,6+21,8@@importsysimportosimportcgiimportsignal+fromrecaptcha.clientimportcaptchafromMailmanimportmm_cfgfromMailmanimportUtils@@-132,6+130,17@@defprocess_form(mlist,doc,cgidata,lang):remote=os.environ.get('REMOTE_HOST',os.environ.get('REMOTE_ADDR','unidentified origin'))++# recaptcha+captcha_response=captcha.submit(+cgidata.getvalue('recaptcha_challenge_field',""),+cgidata.getvalue('recaptcha_response_field',""),+mm_cfg.RECAPTCHA_PRIVATE_KEY,+remote,+)+ifnotcaptcha_response.is_valid:+results.append(_('Invalid captcha'))+# Was an attempt made to subscribe the list to itself?ifemail==mlist.GetListEmail():syslog('mischief','Attempt to self subscribe %s: %s',email,remote)
Additional setup
Then on the /var/lib/mailman/templates/en/listinfo.html template (right below ) add:
<tr><td> Please fill out the following captcha
</td><td><mm-recaptcha-javascript></TD></tr>
Make also sure to generate a public and private key at https://www.google.com/recaptcha and add the following paramaters on your mm_cfg.py file:
RECAPTCHA_PRIVATE_KEY
RECAPTCHA_PUBLIC_KEY
Loading reCAPTCHAs images from a trusted HTTPS source can be done by changing the following line:
A few additional details should be provided in case you are setting this up against a RHEL 6 host: (or any other machine using the EPEL 6 package python-recaptcha-client-1.0.5-3.1.el6)
Importing the recaptcha.client module will fail for some strange reason, importing it correctly can be done this way:
and then fix the imports also making sure sys.path.append(“/usr/share/pyshared”) is not there:
fromrecaptchaimportcaptcha
That’s not all, the package still won’t work as expected given the API_SSL_SERVER, API_SERVER and VERIFY_SERVER variables on captcha.py are outdated (filed as bug #1093855), substitute them with the following ones:
I wanted to give Fedy a try yesterday, specifically to install the **Brackets **code editor designed for web developers. I’m pretty lazy when it comes to install external packages (from the Brackets.io’s homepage it looked like only a DEB file was available) and after asking a few friends who made heavy use of Fedy in the past about its stability and credibility I went ahead and followed the provided instructions to set it up.
The interface was pretty straightforward and installing Brackets was as easy and clicking on the relevant button. Before starting the installation I gave a fast look around to the various bash scripts used by Fedy to install the package I wanted and yeah, I admit I did not pay enough attention to a few lines of the code and went ahead with the installation.
After hacking a bit with Brackets I decided it was time for me to head to bed but shutting down my laptop surprisingly returned various errors related to Systemd’s journal not being able to shutdown properly. I then tried to reboot the machine and found out the laptop was totally not bootable anymore.
The error it was reported at boot (Systemd Journal not being able to start properly) was pretty strange and after looking around the web I couldn’t find any other report about similar failures. I then started digging around with a friend and made the following guesses:
The root partition was running out of space (just 70M left), I then cleaned it a bit and rebooted with no luck. My first guess was /tmp going out of space when Systemd tries to populate it at boot time.
I checked yum history to find out what Fedy could have taken in, but nothing relevant was found given Fedy does not install RPM packages on its own, it usually retrieves a tarball (or in my case a DEB package) and installs it by extracting / cping the content
I turned SELinux to Permissive and rebooted the machine, surprise, the machine was bootable again
The next move was running a restorecon -r -v / against the root partition, the result was awful: the whole /usr‘s context was turned into usr_tmp_t. Digging around the code for the Brackets installer the following code was found:
mkdir -p "${file%.*}"ar p "$file""data.tar.gz"| tar -C "${file%.*}" -xzf -
cp -af ${file%.*}/* "/"
<br>
And previously:
get_file_quiet "http://download.brackets.io/""brackets.htm"get=$(cat "brackets.htm"| tr ' ''\n'| grep -o "file.cfm?platform=LINUX${arch}&build=[0-9]*"| head -n 1| sed -e 's/^/http:\/\/download.brackets.io\//')file="brackets-LINUX.deb"
<br>
So what the installer was doing is:
Downloading the DEB file from the Brackets website
Extracting its content to /tmp/fedy and copying the contents of the data.tar.gz tarball in place
A tree view of the data.tar.gz file:
.
|-- opt
|`-- brackets
`-- usr
|-- bin
`-- share
<br>
Copying the extracted content of the data.tar.gz tarball to the target directories will do exactly one thing: it will overwrite the SELinux context of your /usr, /bin, /share directories breaking your system. I would advise everyone to NOT make use of Fedy for installing the Brackets editor until the issue has been fixed. Honestly speaking I didn’t have time / willingness to check other bash scripts but something nasty might be found there as well. Generally I would never recommend to install anything on your system without making use of an RPM package. Lesson learned for me to never trust such tools in the future on my local system.
It’s been a while now since the very first time I posed my hands on this shiny new Samsung Chronos Series 7 laptop and oh dear… how much pain did my metallic-grey fellow take me in order to figure out how properly have every single piece of the hardware working as expected?
What I did right after unboxing it was dropping Windows 8 with a copy of Fedora 20 (yeah, stupid me, I could have booted Windows 8 at least once to check for UEFI / firmware updates) and setting everything up as usual. Right after booting the machine I disabled Windows 8’s Secure Boot, configured the laptop to boot from the USB Key I plugged in and restarted it to finally perform the real OS installation.
The laptop booted back (with UEFI mode marked as on) and the installation started. The Chronos Series 7 came with an iSSD of 16G in size, not much but definitely enough for keeping the root partition, swap and home directory. (I don’t need an huge home dir given all the various data is stored and mounted through NFS directly from the NAS)
The installation went just fine and no issues arised at all until I booted into the system. The laptop since the beginning started to reach high CPU and graphics card temperatures (sticking around 75-78 C for the CPU and 60 C for the NVIDIA card), the fans were constantly on and I could feel the heat of the machine while typing. But that’s not all, the backlit keyboard had its lights always set as on (even in the case of a locked screen) and the battery life was sticking around one hour and an half.
I’m now going to list all my findings and solutions for the above issues after spending some time debugging and trying hard.
UEFI vs CSM (Legacy BIOS Compatibility mode)
Installing Fedora 20 with UEFI will result in your laptop not loading the samsung-laptop kernel module at all. That is the result of a known bug (with a good chance to brick your laptop) on Samsung laptops and UEFI boots (mainly related to the incompatibility between the samsung-laptop kernel module and the Samsung’s UEFI firmware and its corruption when the module is loaded) . More details here and here.
That said, before starting the installation, press Fn+F2 right after powering up your laptop, you will be then prompted with the laptop’s Setup configuration. Switch to the Boot tab and disable Secure Boot making sure CSM is selected on the dropdown window. (before moving on make also sure to disable the Fast BIOS Mode on the Advanced tab before proceeding)
When done, boot up a copy of Fedora 20 with your preferred media (I did use the Live CD myself) and make your way through the installation. Make sure to read on before touching the disk partitioning schemas.
iSSD not recognized with CSM mode marked as on
During one of my trials I did try to install the OS directly on the iSSD (in our examples, /dev/sdb) itself. The result was the system being completely un-bootable probably cause the EFI firmware being unable to recognize the iSSD on CSM mode. (the only disk that was getting recognized was the 750G HDD (in our examples, /dev/sda) the laptop has as an additional storage)
While the EFI firmware is not able to recognize the iSSD at all properly (when in CSM mode) it can flawlessly detect the HDD. That means one thing: we can keep the root, home and swap partitions on the iSSD and move the boot, bios boot partitions on the HDD itself and boot up the machine from there.
The installation
We left our installation tutorial right before starting the installation itself through Anaconda. Let’s resume from there by making sure the following partitions are created on the HDD (from now on /dev/sda):
a bios-boot partition (details on how to set it up at here).
a boot partition (ext4, 500M in size)
Once done, perform the installation on the iSSD (from now on /dev/sdb), my setup on the 16G iSSD:
LVM Volume Group with three logical volumes:
5.12 G /home + Luks (5.12 G for an home directory seems not enough but that’s definitely more than enough when you have a local HDD and a NAS with more than 2T of storage)
7.8 G / (I prefer keeping root a big bigger than home to prevent the need to cleanup the yum cache and other packages cruft every now and then)
1.5 G swap space
Another working setup might be:
A 15G / partition on the iSSD, no need for LVM here
An LVM Volume Group that will store the /home and swap space so you can expand it to be more than just 5G / 1.5G. The LVM VolGroup should ideally go on its own partition on /dev/sda
When the system has been installed, mount the /dev/sda boot partition you previously created and install grub:
mount /dev/sda3 /mnt/boot-sda

grub2-install /dev/sda
I did assume /dev/sda3 was your /boot partition, make sure to check that is right for your case as well. (just run fdisk -l /dev/sda to find out)
When done, mount the /dev/sdb1 partition and copy all the files to the previously created mount point /mnt/boot-sda. From there figure out the UUID (ls -l /dev/disk/by-uuid) for the /dev/sda3 partition and modify the relevant entries on the /boot/grub2/grub.cfg file removing the UUID for the /dev/sdb1 (in my case that was the partition containing /boot) partition with the one of /dev/sda3. Save the file and reboot the machine.
You should then be able to unmount the /boot partition from /dev/sdb1 and modify the relevant /etc/fstab entry with /dev/sda3‘s UUID. That way new kernel’s installations will be handled correctly without the need to manually edit /boot/grub2/grub.cfg and moving around the initramfs / vmlinuz images. At this point it should be safe to remove the /dev/sdb1 partition completely.
Things to do after installing Fedora 20
Installing Bumblebee
The NP700Z3C has a NVIDIA GeForce GT 630M that benefits from the NVIDIA Optimus technology which allows the user to gather the maximum performance possible when launching specific high-demand applications (like during gameplay or while watching an HD movie) and fallback to the integrated GPU when the user is performing normal operations like browsing the web, writing emails or text editing.
Luckily the Bumblebee project comes in help about this providing Optimus support for a variety of Linux distributions. More details on how to set it up here. (you will need bumblebee, bumblebee-nvidia and bbswitch)
Installing TLP
From the tlp‘s website:
TLP brings you the benefits of advanced power management for Linux without the need to understand every technical detail. TLP comes with a default configuration already optimized for battery life, so you may just install and forget it. Nevertheless TLP is highly customizable to fulfil your specific requirements.
I can tell you power management for your laptop has never been easier with tlp. Make sure to visit tlp’s homepage for more details on how to set it up.
Samsung Tools
From the samsung-tool‘s homepage:
Samsung Tools is the successor of Samsung Scripts provided by the ‘Linux On My Samsung’ project.
It enables control in a friendly way of the devices available on Samsung laptops (bluetooth, wireless, webcam, backlight, CPU fan, special keys) and the control of various aspects related to power management, like the CPU undervolting (when a PHC-enabled kernel is available).
Given there’s no RPM available for samsung-tools, downloading the tarball and running make as root should suffice for installing it on your laptop.
Kernel flags
What seem to have helped me a lot with the high CPU temperatures (and thus with the noisy fans going on and on) are the following Kernel flags you should pass to Grub through the /etc/sysconfig/grub file on the GRUB_CMDLINE_LINUX line:
The above procedure has been tested with the laptop having the following specs.
The average temperature for the CPU is sticking around 47-51 C, while the discrete GPU at 49-51C. I could also get around 3.5 – 4 hours of battery life!
That should be all! Please leave me a comment in case of questions, troubles with the above setup!